Developer Guide
![]()
MODTrek is a desktop application for managing a typical NUS Computer Science student’s modules and degree progression, optimised for use via a Command Line Interface (CLI). The app provides a convenient platform for students to easily access and update their modules within presses of a keyboard.
This application is currently geared towards NUS Computer Science Students of the AY2021-2022 cohort only. We hope to expand our application’s scope in the coming years.
Table of Contents
- Acknowledgements
- Setting up, getting started
-
Design
3.1. Architecture
3.2. UI component
3.3. Logic component
3.4. Model component
3.5. Storage component
3.6. Common classes
-
Implementation
4.1. Add module feature
4.2. Find module feature
4.3. Delete module feature
4.4. Sort modules feature
4.5. View progress/modules feature
- Documentation, logging, testing, configuration, dev-ops
-
Appendix: Requirements
6.1. Product Scope
6.2. User Stories
6.3. Use Cases
6.4. Non-Functional Requirements
6.5. Glossary
-
Appendix: Instructions for manual testing
7.1. Launch and shutdown
7.2. Adding a module
7.3. Deleting a module
7.4. Editing a module
7.5. Adding/removing tag(s) to a module
7.6. Finding module(s)
7.7. Sorting modules
7.8. Toggling between Degree Progress and Module List screens
7.9. Requesting for help
7.10. Exiting the program
7.11. Saving data
Acknowledgements
- The skeleton implementation of DoughnutChart in ProgressSection is adapted from this stackoverflow post.
Setting up, getting started
Refer to the guide Setting up and getting started.
Design
Architecture
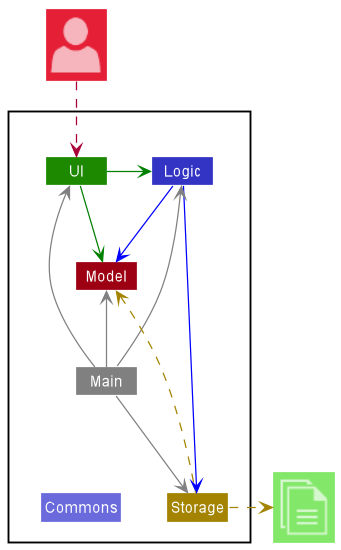
The Architecture Diagram given above explains the high-level design of the App.
Given below is a quick overview of main components and how they interact with each other.
Main components of the architecture
Main has two classes called Main and MainApp. It is responsible for,
- At app launch: Initializes the components in the correct sequence, and connects them up with each other.
- At shut down: Shuts down the components and invokes cleanup methods where necessary.
Commons represents a collection of classes used by multiple other components.
The rest of the App consists of four components.
-
UI: The UI of the App. -
Logic: The command executor. -
Model: Holds the data of the App in memory. -
Storage: Reads data from, and writes data to, the hard disk.
How the architecture components interact with each other
The Sequence Diagram below shows how the components interact with each other for the scenario where the user issues the command delete cs1101s.
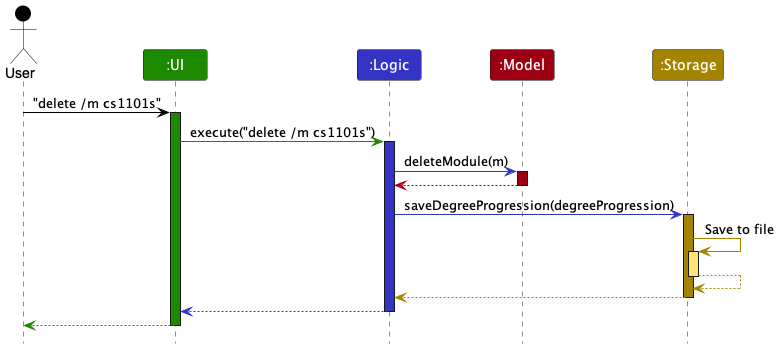
Each of the four main components (also shown in the diagram above),
- defines its API in an
interfacewith the same name as the Component. - implements its functionality using a concrete
{Component Name}Managerclass (which follows the corresponding APIinterfacementioned in the previous point).
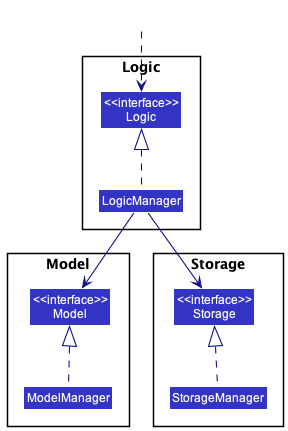
For example, the Logic component defines its API in the Logic.java interface and implements its functionality using the LogicManager.java class which follows the Logic interface. Other components interact with a given component through its interface rather than the concrete class (reason: to prevent outside component’s being coupled to the implementation of a component), as illustrated in the (partial) class diagram below.
The sections below give more details of each component.
UI component
API : Ui.java
Here’s a (partial) class diagram of the Ui component:
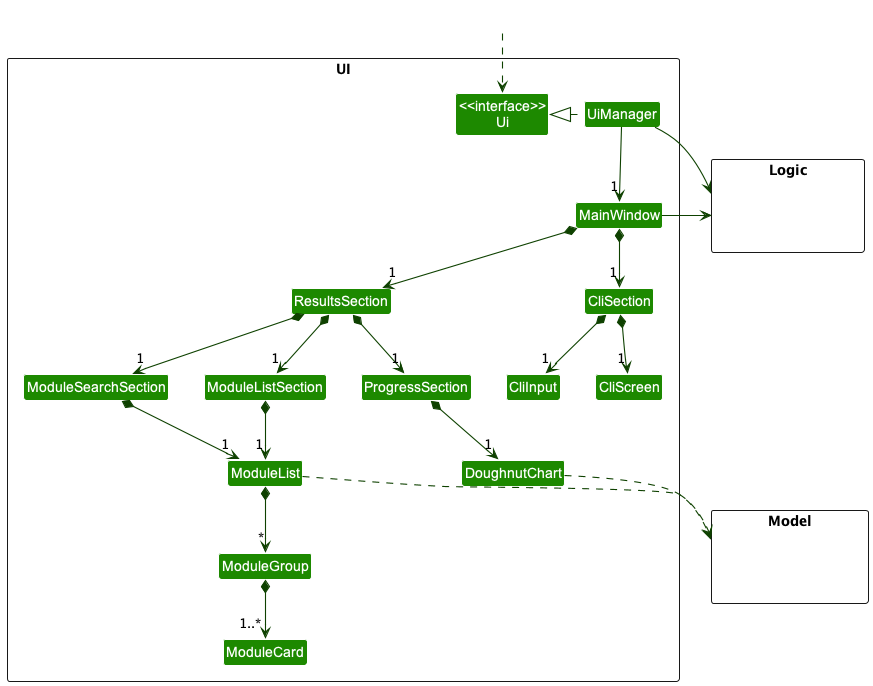
MainWindow (with the exception of DoughnutChart, CliScreen and CliInput) inherit from the abstract UiPart class (not shown in the above class diagram) which captures the commonalities between classes that represent parts of the visible GUI.
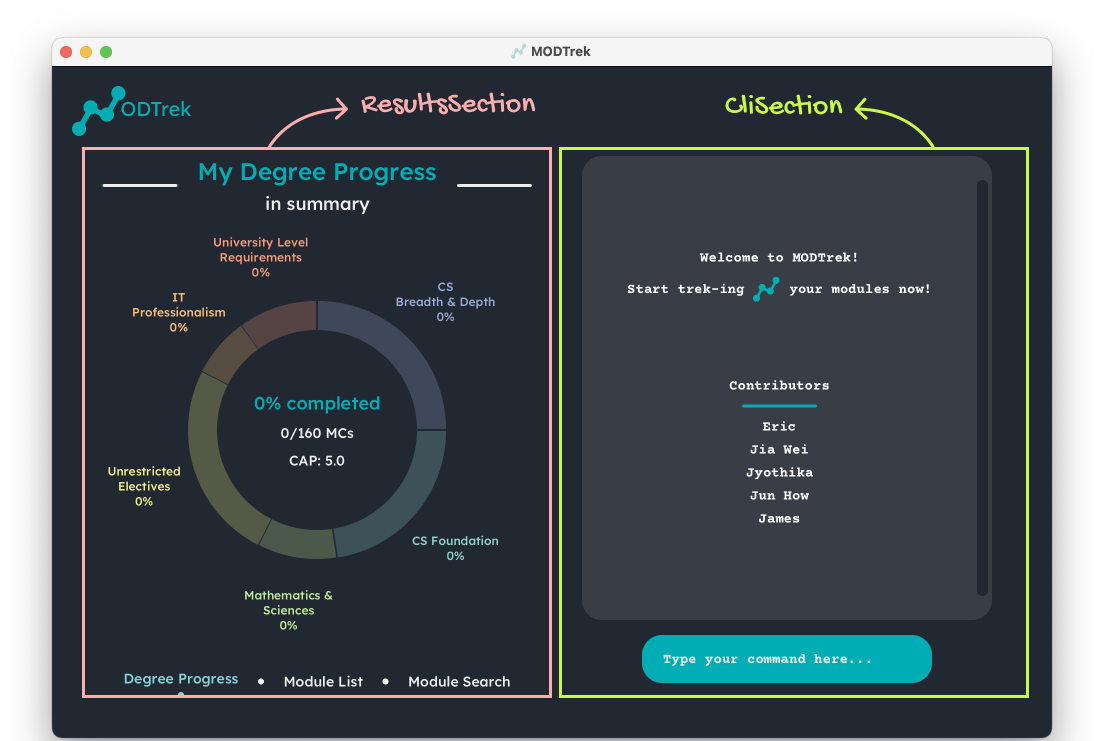
The UI consists of a MainWindow that is made up of two main sections: ResultsSection and CliSection, as depicted below:
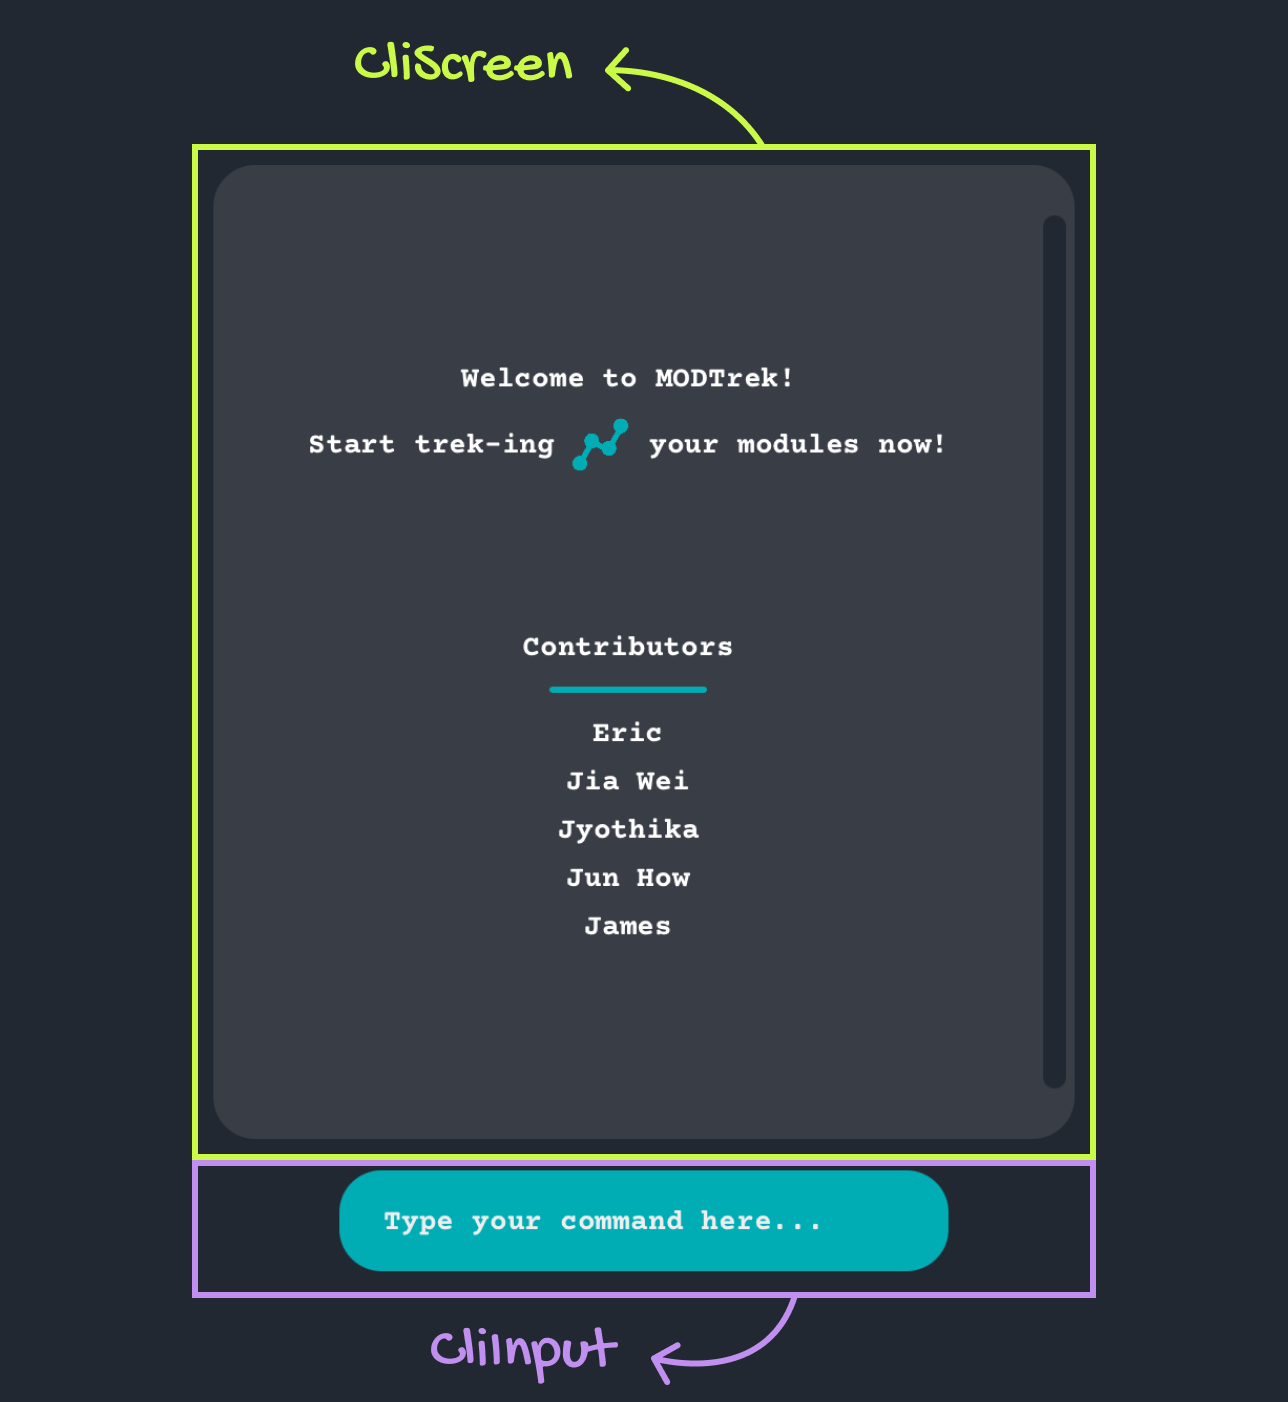
CliSection consists of CliScreen and CliInput components, depicted below:
ResultsSection consists of three subsections: ProgressSection, ModuleListSection and ModuleSearchSection, as depicted below. At any point in time, only one section is actively shown on the ResultsSection.
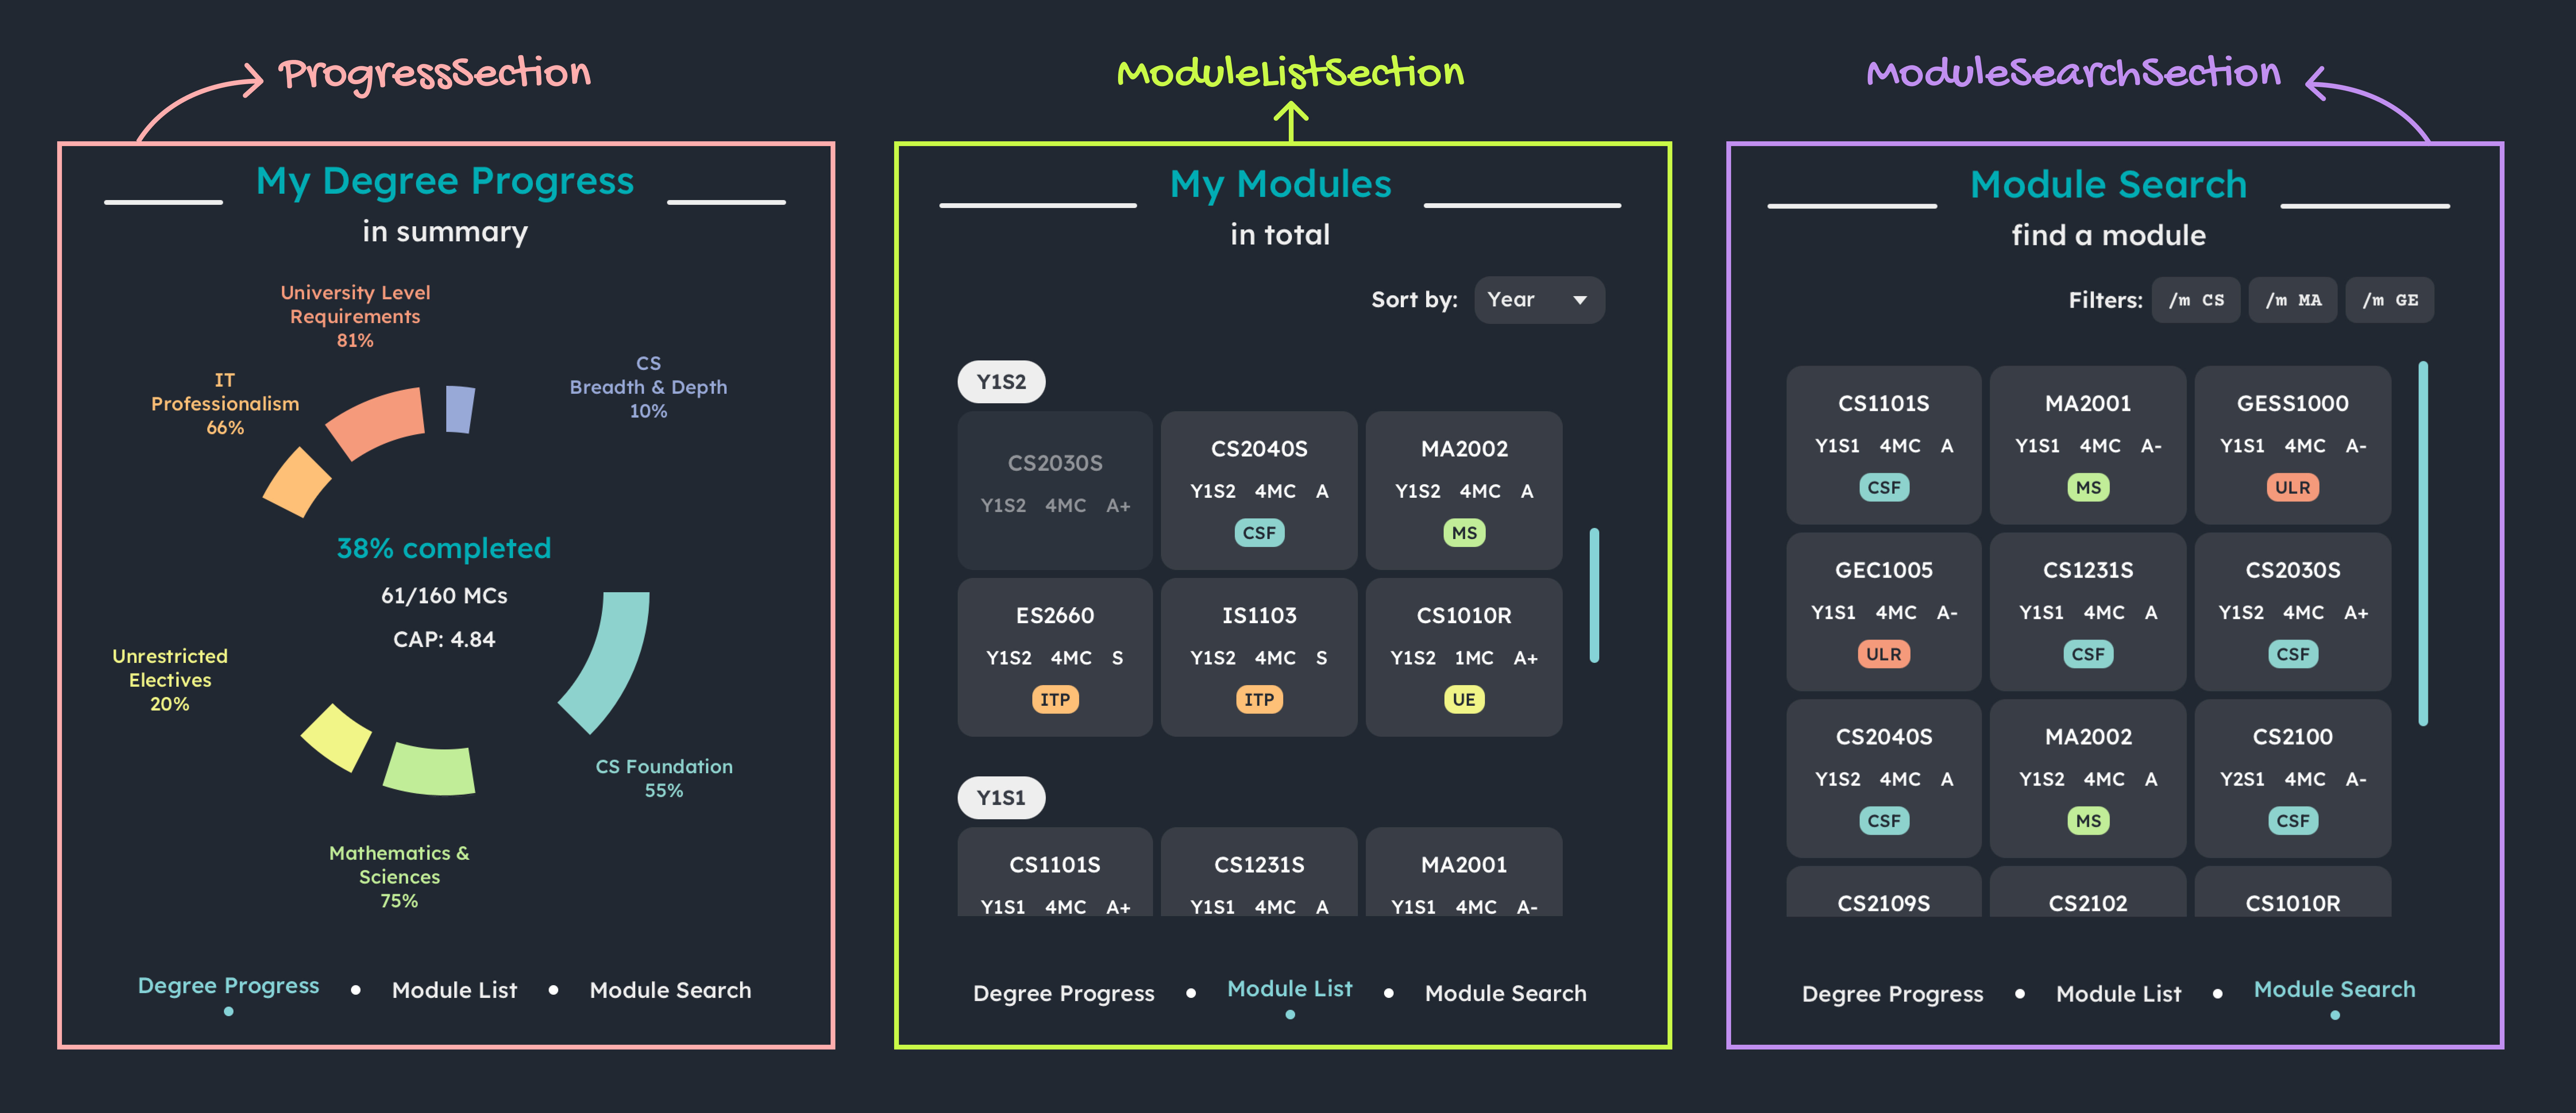
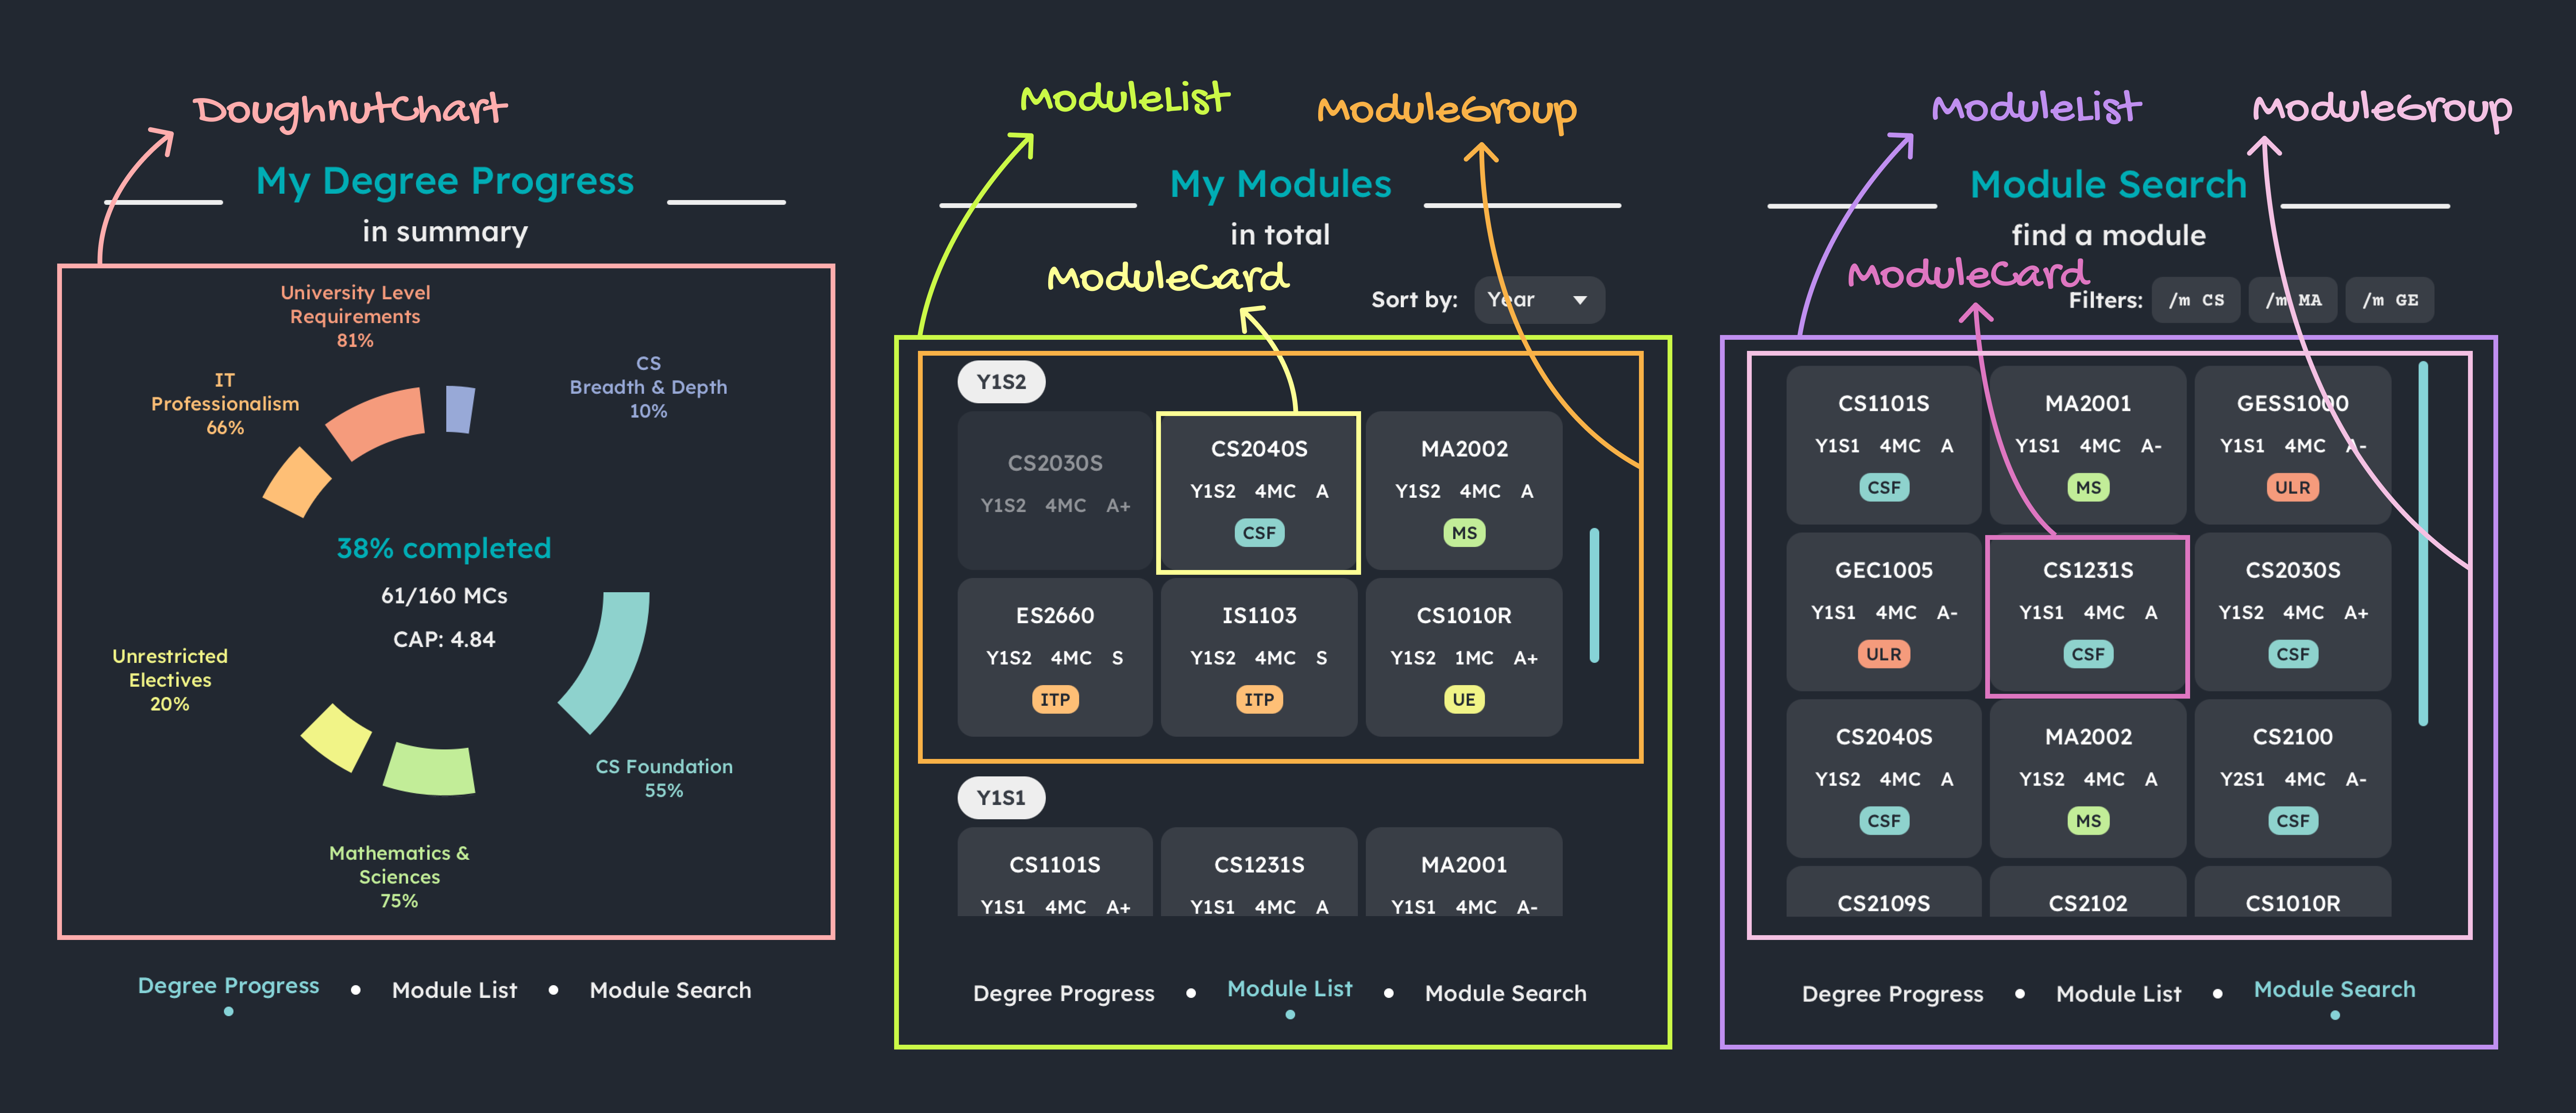
Each of these subsections consists of smaller UI components, which are annotated below:
CliScreen and CliInput due their simplicity in functionality. It is sufficient to compose them within the CliSection class in the form of basic JavaFx components (CliScreen as a VBox and CliInput as a TextField). They are referenced in CliSection.fxml.
Likewise, many smaller, simple components composed within larger components like ModuleCard do not have separate Java classes created for them.
The Ui component uses the JavaFx UI framework. The layout of these UI parts are defined in matching .fxml files that are in the src/main/resources/view folder. For example, the layout of the MainWindow is specified in MainWindow.fxml
The Ui component,
- executes user commands using the
Logiccomponent. - listens for changes to
Modeldata so that the UI can be updated with the modified data. - keeps a reference to the
Logiccomponent, because theUIrelies on theLogicto execute commands. - depends on some classes in the
Modelcomponent, as it displaysModuleandDegreeProgressionobjects residing in theModel.
Logic component
API : Logic.java
Here’s a (partial) class diagram of the Logic component:
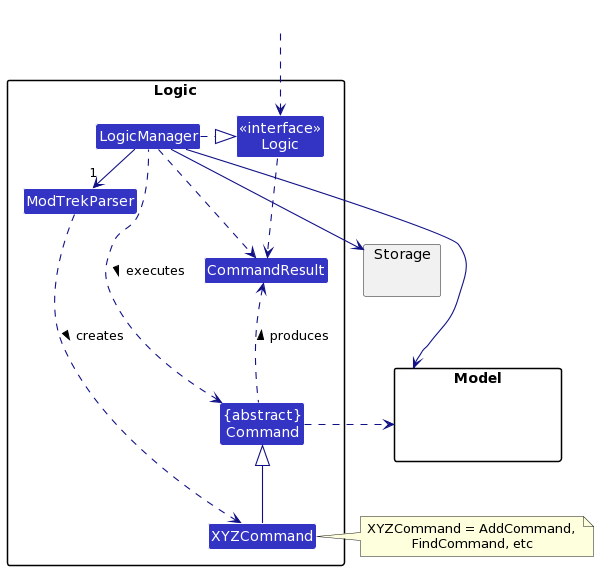
How the Logic component works:
- When
Logicis called upon to execute a command, it uses theModTrekParserclass to parse the user command. - This results in a
Commandobject (more precisely, an object of one of its subclasses e.g.,AddCommand) which is executed by theLogicManager. - The command can communicate with the
Modelwhen it is executed (e.g. to add a module). - The result of the command execution is encapsulated as a
CommandResultobject which is returned back fromLogic.
The Sequence Diagram below illustrates the interactions within the Logic component for the execute("delete /m CS1010 /m Cs2040") API call.
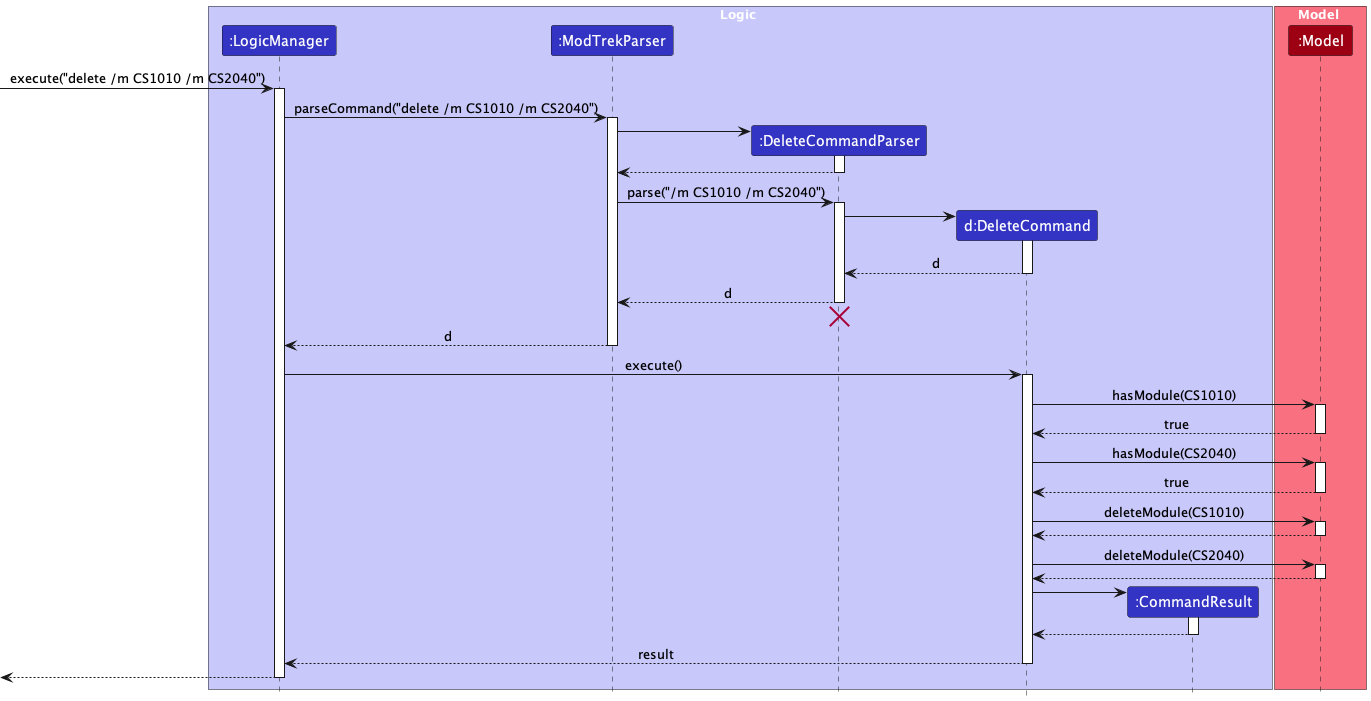
DeleteCommandParser should end at the destroy marker (X) but due to a limitation of PlantUML, the lifeline reaches the end of diagram.
Here are the other classes in Logic (omitted from the class diagram above) that are used for parsing a user command:
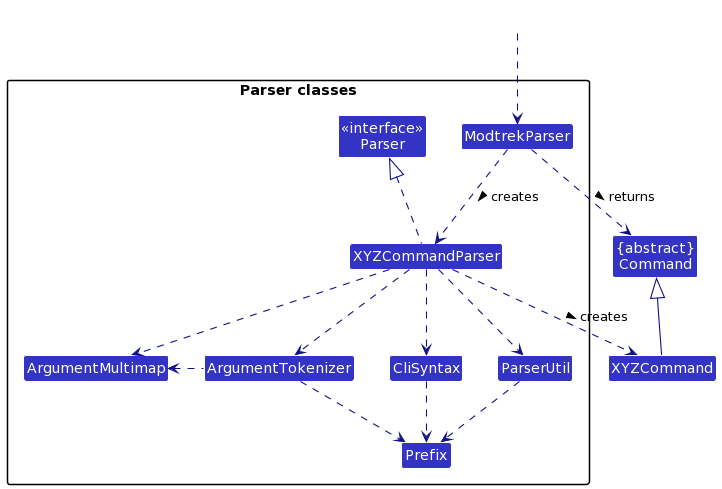
How the parsing works:
- When called upon to parse a user command, the
ModTrekParserclass creates anXYZCommandParser(XYZis a placeholder for the specific command name e.g.,AddCommandParser) which uses the other classes shown above to parse the user command and create aXYZCommandobject (e.g.,AddCommand) which theModTrekParserreturns back as aCommandobject. - All
XYZCommandParserclasses (e.g.,AddCommandParser,DeleteCommandParser, …) inherit from theParserinterface so that they can be treated similarly where possible e.g, during testing.
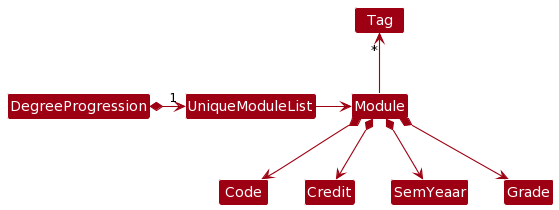
Model component
API : Model.java
Here’s a (partial) class diagram of the Model component:
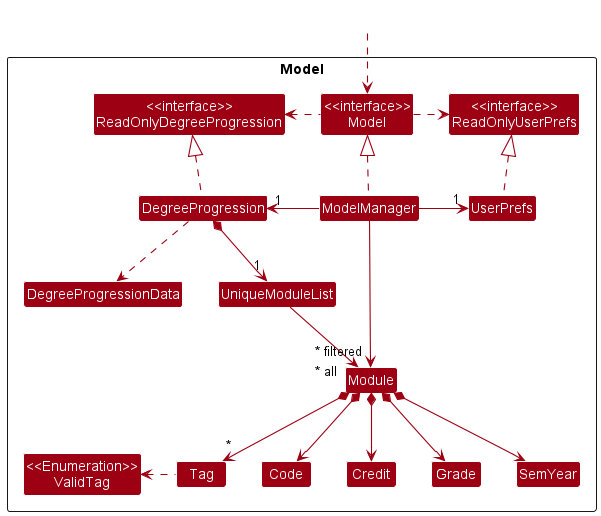
The Model component,
- stores the degree progression i.e., all
Moduleobjects (which are contained in aUniqueModuleListobject) and generatesDegreeProgressionDataif needed. - stores the currently ‘selected’
Moduleobjects (e.g., results of thefindcommand) as a separate filtered list which is exposed to outsiders as an unmodifiableObservableList<Module>that can be ‘observed’ e.g. the UI can be bound to this list so that the UI automatically updates when the data in the list change. - stores a
UserPrefobject that represents the user’s preferences. This is exposed to the outside as aReadOnlyUserPrefobjects. - does not depend on any of the other three components (as the
Modelrepresents data entities of the domain, they should make sense on their own without depending on other components)
Storage component
API : Storage.java
Here’s a (partial) class diagram of the Storage component:
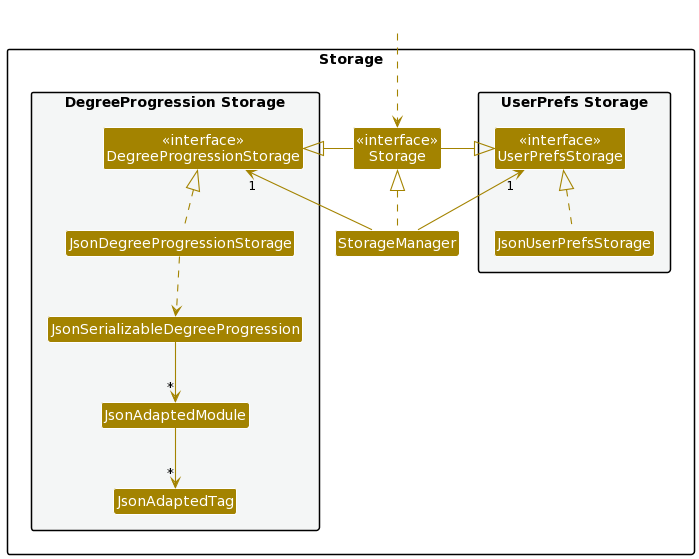
The Storage component,
- can save both degree progression’s
UniqueModuleListand user preference data in json format, and read them back into corresponding objects. - inherits from both
DegreeProgressionStorageandUserPrefStorage, which means it can be treated as either one (if only the functionality of only one is needed). - depends on some classes in the
Modelcomponent (because theStoragecomponent’s job is to save/retrieve objects that belong to theModel)
Common classes
Classes used by multiple components are in the seedu.modtrek.commons package.
Implementation
This section describes some noteworthy details on how certain features are implemented.
Add module feature
About this feature
The add module feature allows users to quickly add a module in to the application using the command add /m <code> /c <credits> /y <year-semester> (/g <grade>) (/t <tag>...)
How it is implemented
The add command is facilitated by the AddCommand and the AddCommandParser.
AddCommandParser makes use of the ArgumentTokenizer::tokenize to extract out the relevant inputs of each field which will be used to make new Code, Credit, SemYear, Grade and Set<Tag> objects. These objects will then be used to make a new Module object. The method addModule from the Model interface will then add the new Module object into the UniqueModuleList of modules.
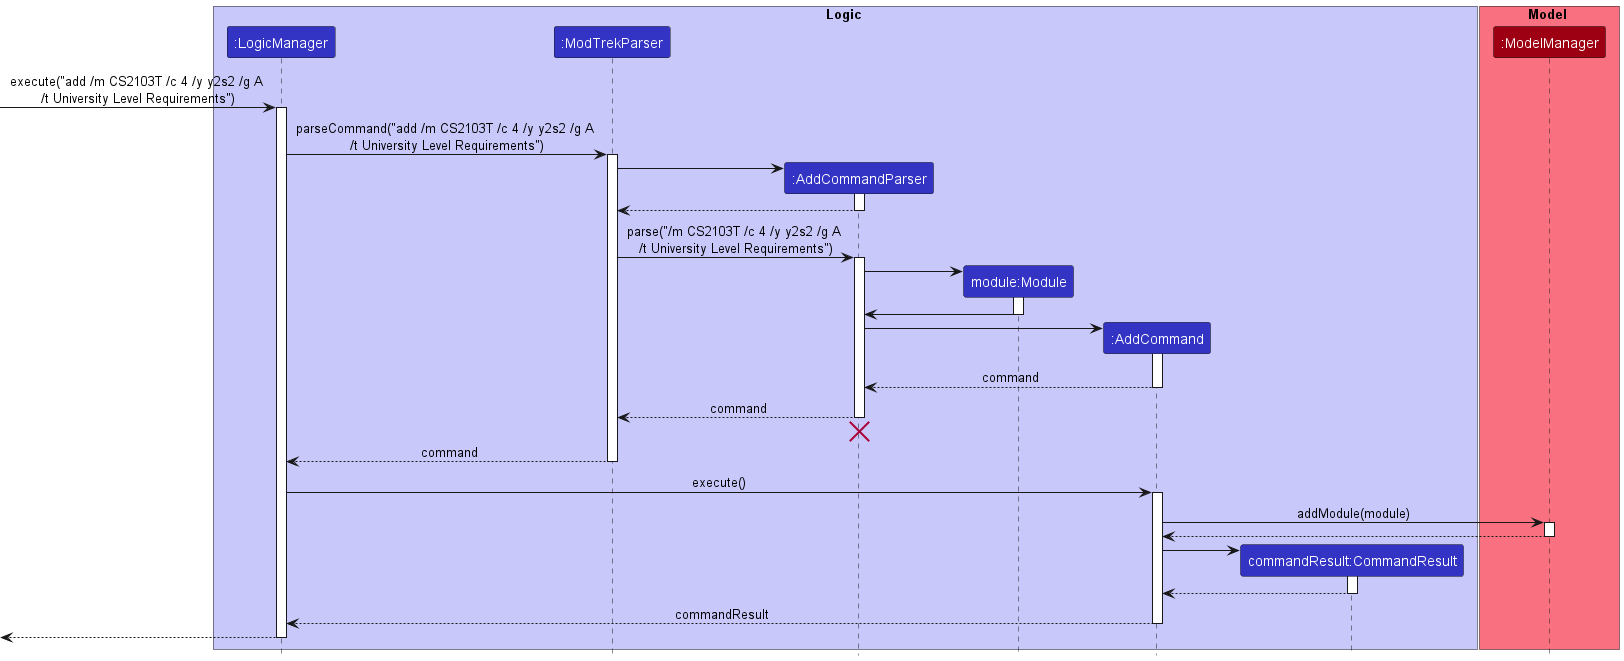
Parsing user input
- The user inputs the
addcommand with its relevant details. - The
LogicManagertakes the input and passes it to theModTrekParserwhich processes the input and recognises it as an add command and makes a newAddCommandParser. - The
AddCommandParserthen callsArgumentTokenizer::tokenizeto extract the relevant inputs of each field. If any of the compulsory fields are missing, aParseExceptionwould be thrown. -
ParserUtilwill then check the validity of the input forCode,Credit,SemYear,GradeandSet<Tag>and make an object for them. If any of the inputs are invalid, aParseExceptionwill be thrown. - A
Moduleobject will then be created with the objects created for each input field and anAddCommandobject which takes in thatModuleobject will be created.
Command execution
- The
LogicManagerexecutes theAddCommand -
AddCommandcallsModelManager::addModulewhich is implemented theModelinterface to add theModuleinto theUniqueModuleListofDegreeProgression.
Displaying of result
-
AddCommandwill create a newCommandResultwith a success message and return it back to theLogicManager. - The GUI will make extract out the message from the
CommandResultand display it to the user.
Design consideration
Some users may not have taken the module or are still not certain how they want to tag the module. We hence implemented for the Code, Credit and SemYear fields to be compulsory so that they can add the modules
yet to be taken as a way of letting them plan what modules that want to take in the future.
The following sequence diagram shows how the add command works:
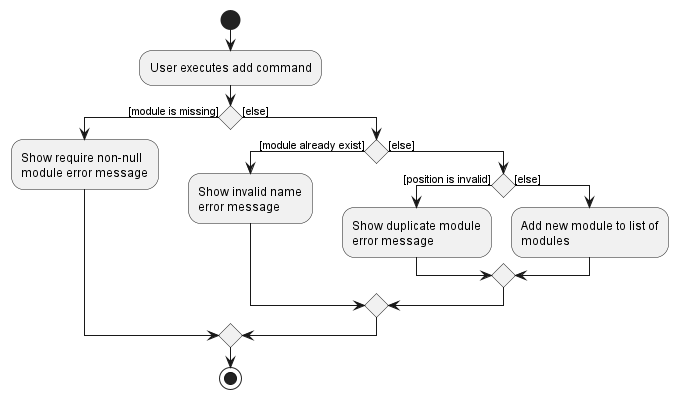
The following activity diagram shows what happens when a user executes an add command:
Find module feature
About this feature
The find module feature serves as a filtering tool that allows users to find a specific modules based on its code or according to code prefix(es), credit(s), year-semester(s), grade(s), or tag(s).
The command format is either find (<moduleCode>) or find (/m <codePrefix>...) (/c <credits>...) (/y <year-semester>...) (/g <grade>... (/t <tags>...)
How it is implemented
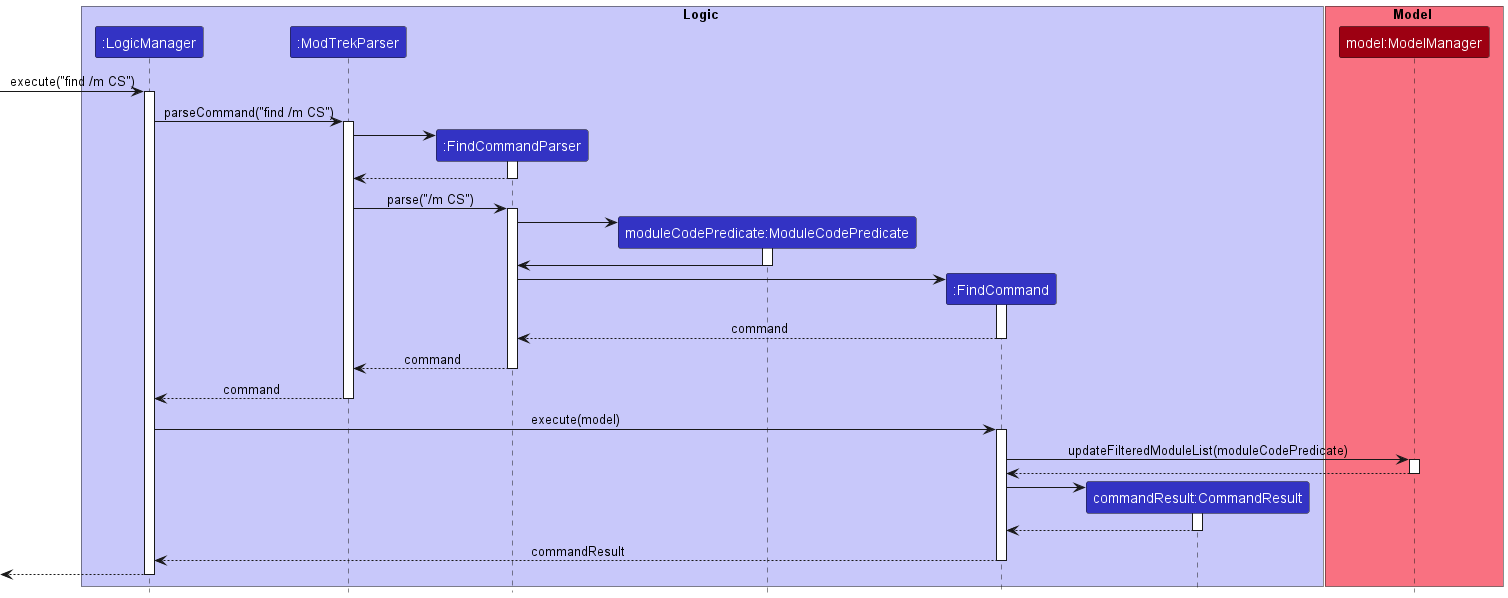
The find command is facilitated by the FindCommand and the FindCommandParser classes.
FindCommandParser makes use of the ArgumentTokenizer::tokenize method to extract out the relevant inputs of each field in the form of a String which will be used as arguments to make a new ModuleCodePredicate object. In the same FindCommandParser class, a new FindCommand object will be instantiated, with the ModuleCodePredicate object being passed as an argument. Finally, the FindCommand object will be executed by the LogicManager.
Parsing user input
- The user inputs the
findcommand with the relevant arguments. At least one argument needs to be provided. - The
LogicManagertakes the input and passes it to theModTrekParserwhich processes the input, recognises it as a find command and makes a newFindCommandParserobject. - The
FindCommandParserthen callsArgumentTokenizer::tokenizeto extract out the relevant inputs of each field. If no arguments are provided, or if prefixes are provided without the relevant details, aParseExceptionwill be thrown. - The
ParserUtilwill then check the validity of the input(s) forCodeorCodePrefix,Credit,SemYear,GradeandTag. If any of the inputs are invalid, aParseExceptionwill be thrown as well. - If the input is valid,
ModuleCodePredicateobject will be created, taking in the argumentsisCode,moduleCode,codePrefixes,credits,semYears,gradesandtags. Following which, aFindCommandobject will be created.
Command execution
- The
LogicManagerexecutes theFindCommand. -
FindCommandcallsModelManager::updateFilteredModuleListtaking in theModuleCodePredicateto update theFilteredModuleListformed fromUniqueModuleListofDegreeProgression.
Displaying of result
-
FindCommandwill create a newCommandResultobject with a success message and return it back toLogicManager. - The GUI will extract out the message from the
CommandResultand display it to the user.
Design considerations
Aspect: Command format
User may choose between the two formats for the FindCommand which function differently below:
-
Format 1: Finds a specific module.
- Format notation:
find <moduleCode> - Example:
find CS1101S - Reason for implementation: User may want to conveniently access a specific module which they have taken to check its details.
- Format notation:
-
Format 2: Finds a set of modules by filters (single or multiple). Multiple filters of the same field may be applied.
- Format notation:
find (/m <codePrefix>...) (/c <credits>...) (/y <year-semester>...) (/g <grade>...) (/t <tag>...) - Example:
find /m CS,find /m CS /m MA /g A - Reason for implementation: User may want to filter modules by a few categories to review the modules which fulfil a condition.
- Format notation:
The following sequence diagram shows how the find command works:
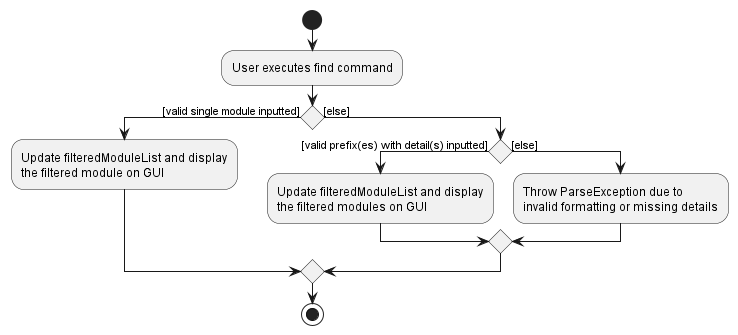
The following activity diagram shows what happens when a user executes a find command:
Delete module feature
About this feature
The delete feature allows users to delete multiple modules via the command
delete /m <module code> /m <module code>... or all modules via the command delete all.
How it is implemented
When the user inputs delete command, the input will be parsed and the all keyword will be extracted using
ArgumentMultimap#preamble(). Otherwise, if the parser does not find the all keyword in the input,
the parser will parse module codes in the input in the form /m <module code> using
ArgumentMultimap#getAllValues(PREFIX_CODE). As the command is executed, all modules will be removed from the
UniqueModuleList if the all keyword is present or the modules with the matching parsed modules codes
will be removed from the UniqueModuleList using the command ModelManager#deleteModule(Module).
Parsing user input
- The user inputs the
deletecommand with its relevant details. - The
LogicManagertakes the input and passes it to theModTrekParserwhich processes the input and recognises it as a delete command and makes a newDeleteCommandParser. - The
DeleteCommandParserthen callsArgumentTokenizer::tokenizeto extract the relevant inputs of each field. If any of the compulsory fields are missing, aParseExceptionwould be thrown. -
ParserUtilwill then check the validity of the inputs forSet<Code>if theallkeyword is missing. If the inputs are invalid, aParseExceptionwould be thrown. -
Codeobjects and aSet<Code>object will be created and aDeleteCommandobject which takes in a boolean,isAllto indicate if theallkeyword is present in the user input, and aSet<Code>object will be created.
Command execution
- The
LogicManagerexecutes theDeleteCommand. - The
DeleteCommandobject callsModelManager::deleteModulewhich is implements theModelinterface to delete the retrievedModuleobjects fromUniqueModuleListofDegreeProgressionbased on theisAllboolean andSet<Code>object.
Displaying of result
-
DeleteCommandwill create a newCommandResultobject with message indicating which modules were successfully deleted based on the input and return it back toLogicManager. - The GUI will extract out the message from the
CommandResultand display it to the user.
Design considerations
Aspect: Command format
User may choose between the two formats for the delete command which function differently below:
-
Format 1: Deletes all specific module.
- Format notation:
delete /m <moduleCode> ... - Example:
delete /m CS3233 /m CS3203 - Reason for implementation: User may want to conveniently delete a specific modules they have withdrawn from or wrongly added.
- Format notation:
-
Format 2: Deletes all modules.
- Format notation:
delete all - Reason for implementation: User may want to start adding modules freshly, in case they realise all or most of the modules they added are irrelevant to them.
- Format notation:
The following sequence diagram shows how the delete command works:
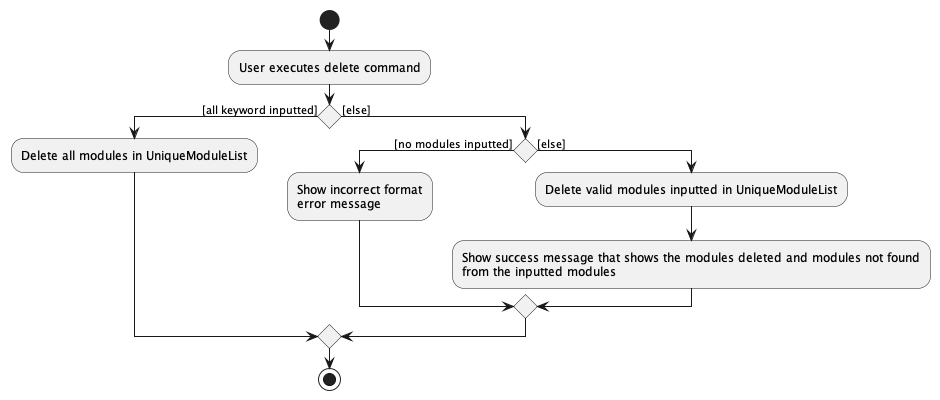
The following activity diagram shows what happens when a user executes a delete command:
Sort modules feature
About this feature
The sort feature allows users to categorise their modules in MODTrek via the command sort <CATEGORY>.
The flag parameter indicates which category to sort by.
The available categories are:
- /y : Semester Year (Default)
- /m : Module Code Prefix
- /g : Grade
- /t : Tags
- /c : Credits
How it is implemented
When the user inputs the sort command with the flag as parameter, the input will be parsed and the flag will be retrieved
with ArgumentMultimap#preamble(). As the command is executed, the list will be sorted into a treemap according to the
flag. Once sorted, the GUI is able to display the sorted modules.
Parsing user input
- The user input
sortcommand - The
ModTrekParserprocesses the input and creates a newSortCommandParser - The
SortCommandParservalidates whetheris present in the input and is one of the 5 available categories. If is absent or invalid, a ParseException would be thrown. - The
SortCommandParserwill check if the flag is valid. If it is invalid, aParseExceptionwill be thrown. - The
SortCommandParserthen creates aSortCommanddetermined by the flag.
Command execution
- The
LogicManagerexecutes theSortCommand. - The
SortCommandcallsmodel::sortModuleGroups(Sort sort)to return a TreeMap sorted by the corresponding category.
Displaying of result
- The
SortCommandcreates aCommandResultwith a success message and boolean to indicate which of the GUI screen to switch to.
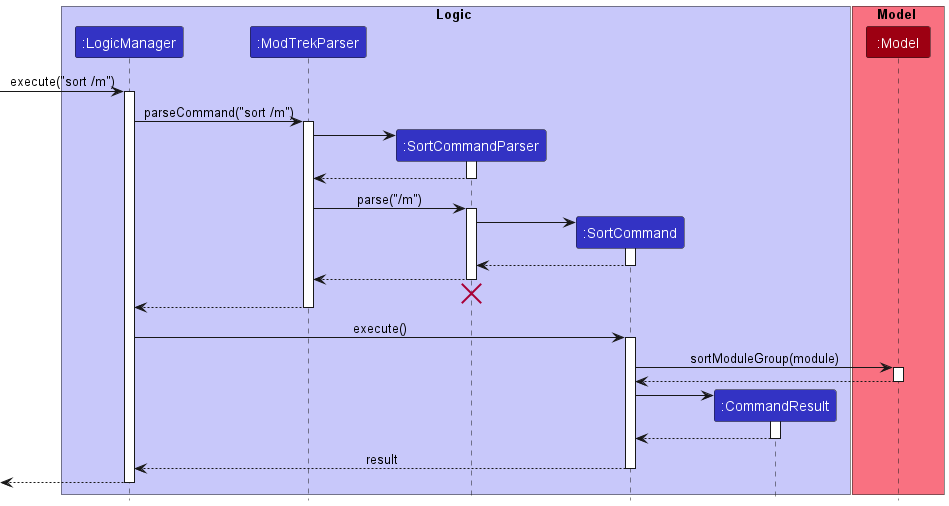
The following sequence diagram shows how SortCommand works during execution for sort /m:
The following activity diagram shows the logic flow as the user inputs the sort command:
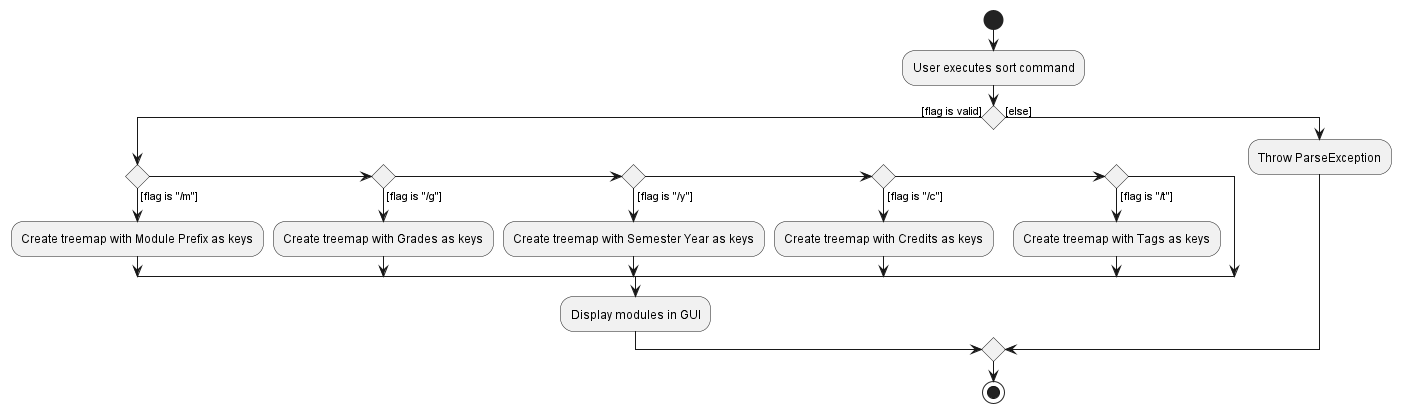
Design considerations
Aspect: Command to sort the modules
As the user adds more modules, he/she might find it more useful to look at the list of modules in different categories. However, the more useful categorising, in terms of progression, will be by the Semester Year. Therefore, at startup, the module list will be categorised by Semester Year, but this command is implemented to give the user flexibility in their module viewing.
View progress/modules feature
About this feature
The View feature displays either the degree progress or modules tracked by the app on the left panel (ResultsSection) of the GUI. The syntax of the command for this feature is view <VIEW_TARGET>, where <VIEW_TARGET> can either be progress or modules.
The view progress command displays some summary statistics of the degree progress to the user as follows:
- Percentage of total MCs completed thus far.
- Number of meaningful (details of meaningful will be under Generation of Progression Data) MCs completed out of total MCs required to compete the CS degree.
- Current CAP.
- Percentage of MCs completed for each degree requirement, displayed in a doughnut chart.
The view progress command also displays more details on the (CliScreen) of the GUI to the user as follows:
- Current CAP.
- Number of MCs completed for each degree requirement.
- Number of MCs in total for planned modules.
- Number of meaningful MCs
The view modules command displays all modules that have been added to the app by the user thus far. The modules displayed are categorised by year/semester by default. The criteria of categorisation can be changed via the sort command (described below). The following details of each module is displayed:
- Module code
- Modular credits
- Year/semester
- Grade (if applicable)
- Tags (degree requirements, if tagged)
How it is implemented
View degree progress:
The following are noteworthy classes involved in the handling of view progress command:
-
ViewCommandwhich handles the execution of the command. -
ViewCommandParserwhich handles the parsing of the command. -
ProgressSectionwhich displays the current degree progress on the GUI. -
DegreeProgressionDatawhich calculates the relevant details based on the module list. -
DegreeProgressionExceptionwhich denotes calculation exception.
View modules:
The following are noteworthy classes involved in the handling of view modules command:
-
ViewCommandwhich handles the parsing and execution of the command. -
ViewCommandParserwhich handles the parsing of the command. -
ModuleListSectionwhich displays all the modules on the GUI.
The implementation details are described in further details below.
Parsing user input
- The user inputs the
viewcommand. -
ModTrekParserprocesses the input and creates a newViewCommandParser. - The
ViewCommandParservalidates whether<VIEW_TARGET>is present in the input and is eitherprogressormodules. If<VIEW_TARGET>is absent or invalid, aParseExceptionwould be thrown. - The
ViewCommandParserthen creates aViewCommand, determined by the<VIEW_TARGET>.
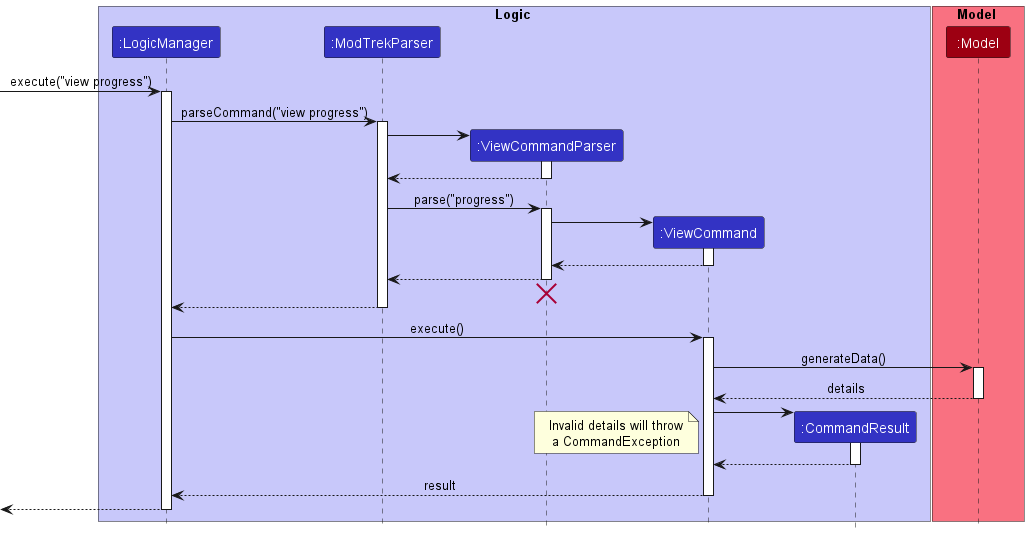
Command execution
View degree progress:
-
LogicManagerexecutesViewCommandand generates theDegreeProgressionData. - If the
DegreeProgressionDatais invalid, aCommandExceptionis thrown to notify the user that the calculation has an error. - On success, the execution returns a
CommandResult, encapsulating the information that degree progress is to be displayed and the information to be displayed on the (CliScreen).
View modules:
-
LogicManagerexecutesViewCommandand returns aCommandResult, encapsulating the information that all modules tracked by the app so far are to be displayed.
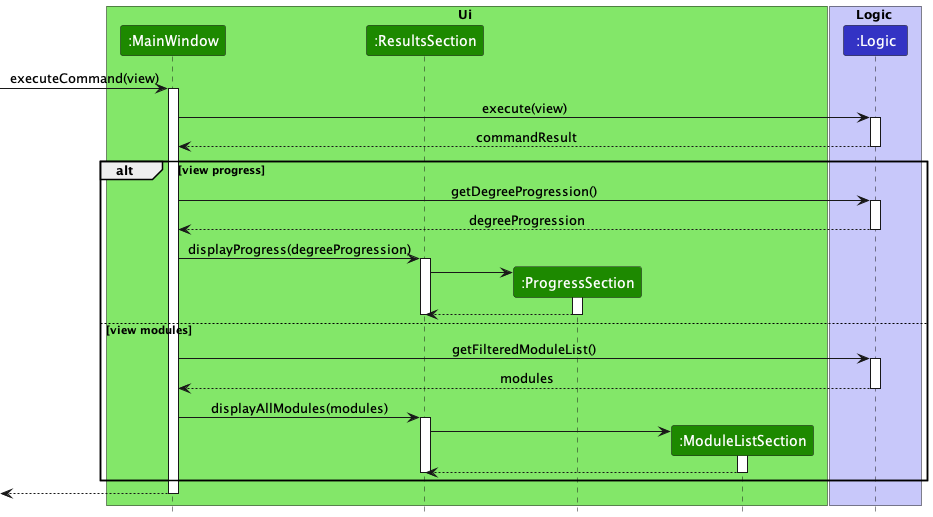
Displaying of result
-
MainWindowvalidates from the returnedCommandResultthat the degree progress is to be displayed on the GUI, and callsResultsSection::displayProgress.ResultsSection::displayProgresstakes in aReadOnlyDegreeProgressionobject which encapsulates information on the user’s current degree progress, based on the modules added by the user thus far. -
ResultsSectionrenders theProgressSection, which displays aDoughnutChart. -
DoughnutChartobtains and displays summary statistics regarding the degree progress through theDegreeProgressionDataobject.
The following sequence diagram illustrates how the view command works for the GUI:
The following sequence diagram illustrates what happens when the user inputs the view progress command:
The following activity diagram illustrates the workflow of the view command:

Generation of Degree Progression Data
An algorithm is used to generate the necessary data for view progress. Meaningful credits are credits counted into the requirements that are not duplicated. This is to prevent the scenario where multiple modules tagged into a singular requirement and the overall completion rate is 100%.
The following activity diagram illustrates the workflow of the algorithm when DegreeProgressionData::generate is called with the module list:
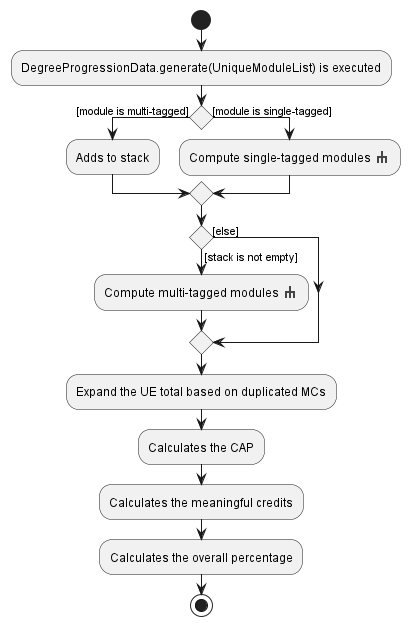
Activity: Computation activity flow
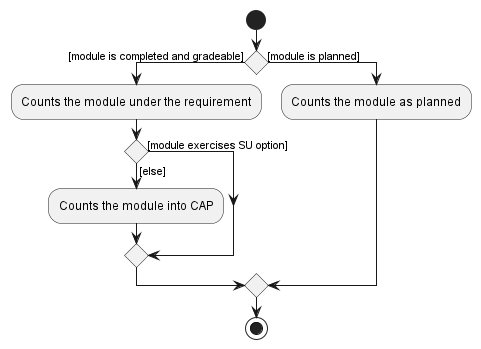
Activity: Compute single-tagged modules
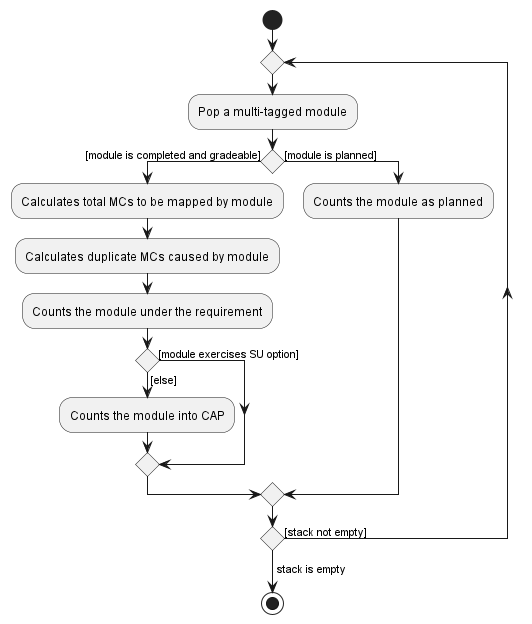
Activity: Compute multi-tagged modules
Design considerations
Aspect: How to signal the Ui component to display the relevant screen (either ProgressSection or ModuleListSection), while ensuring that the Separation of concerns principle is not violated?
The view <VIEW_TARGET> command involves dynamic changes to the GUI, in terms of the correct screen to display upon execution of the command. Bearing in mind the Separation of concerns principle, we have to find an appropriate way to signal to MainWindow which screen is to be displayed, while ensuring that MainWindow does not handle any checking or parsing of the user input to obtain this information.
-
Solution: Pass the information to the
CommandResultreturned by executingViewCommand. SinceMainWindowalready has access toCommandResult, we can easily obtain the correct information regarding which screen to display throughCommandResult.
Documentation, logging, testing, configuration, dev-ops
Appendix: Requirements
Product scope
Target user profile:
- is a mainstream NUS Computer Science student
- has a need to track their degree progress, modules and grades
- prefer desktop apps over other types
- can type fast
- prefers typing to mouse interactions
- is reasonably comfortable using CLI apps
- wants an overview of their academic progress quickly
Value proposition: Manage module grades and credits faster than typical GUI/app
- All module information taken by student is recorded in a single platform and can be referred to easily
- Offers a higher level of convenience, since the user can access module features within clicks on a keyboard
User stories
Priorities: High (must have) - * * *, Medium (nice to have) - * *, Low (unlikely to have) - *
| Priority | As a… | I want to… | So that I can… |
|---|---|---|---|
| * * * | User | add a new module to a current or previous semester | track what modules I have already taken |
| * * * | User | edit module details | correct mistakes in details I previously added |
| * * * | User | delete a module | remove modules that I have wrongly added |
| * * * | User | list out all modules | view what modules I have already taken |
| * * * | User | tag a module with degree requirements (e.g. University Level Requirements, Computer Science Foundation etc). | track which degree requirement each module fulfils |
| * * * | New user | see usage instructions | refer to instructions when I forget how to use the App |
| * * | User | find a module by code, grade, semester and/or credits | locate some specific modules without having to go through the entire list |
| * * | User | sort modules by subject, grade, semester, credits, level, tag | view my modules from another consolidated point of view |
| * * | User | view my CAP | know how well I have done so far in my CS |
| * * | User | check how much of each degree requirement I have completed | know what requirements I still need to complete |
| * * | User | view my current degree completion progress in terms of percentage and number of MCs completed | - |
Use cases
(For all use cases below, the System is the MODTrek and the Actor is the user, unless specified otherwise)
Use case: Add a module
MSS
- User requests to add a module.
-
MODTrek adds the module to the module list.
Use case ends.
Extensions
-
1a. The given module code, credits and/or year-semester is missing or invalid.
-
1a1. MODTrek shows an error message.
Use case ends.
-
Use case: Edit a module
MSS
- User requests to edit a module’s details.
-
MODTrek edits the module’s details.
Use case ends.
Extensions
-
1a. No fields to edit (e.g. module code, year-semester) are provided.
-
1a1. MODTrek shows an error message.
Use case ends.
-
Use case: Delete a module
MSS
- User requests to delete a specific module(s) in the module list.
-
MODTrek deletes the module(s).
Use case ends.
Extensions
-
1a. The list is empty.
- 1a1. No modules are deleted.
Use case ends.
-
1b. The module requested to be deleted is not present in the module list.
- 1b1. No modules are deleted.
Use case ends.
-
1c. The given module code is invalid.
- 1c1. MODTrek shows an error message.
Use case ends.
Use case: Find modules
MSS
- User requests to find modules according to a certain set of filters (e.g. module code, year-semester etc).
-
MODTrek finds the modules satisfying the set of filters and displays them.
Use case ends.
Extensions
-
1a. The set of filters provided by the user is empty.
-
1a1. MODTrek shows an error message.
Use case ends.
-
-
2a. No matching modules were found.
-
2a1. MODTrek shows a message indicating that no matching modules were found.
Use case ends.
-
Use case: Tag module
MSS
- User requests to tag a module with one or more degree requirement(s).
-
MODTrek tags the module and displays it.
Use case ends.
Extensions
-
1a. The module requested to be tagged is not present in the module list.
-
1a1. MODTrek shows an error message.
Use case ends.
-
-
1b. A tag provided by the user is not one of the six valid degree requirements.
-
1b1. MODTrek shows an error message.
Use case ends.
-
Use case: View all modules
MSS
- User requests to view all modules in the module list.
- MODTrek shows the list of modules.
Use case ends.
Extensions
- 1a. The module list is empty.
-
1a1. MODTrek shows a message indicating that there are no modules found in the module list.
Use case ends.
-
Use case: View degree progress
MSS
- User requests to view the degree progress.
- MODTrek shows the user’s degree progression data.
Use case ends.
Extensions
- 1a. The module list is empty.
-
1a1. MODTrek shows an empty degree progression data.
Use case ends.
-
Use case: Sort modules
MSS
- User requests to sort the modules in the module list by a certain category (year, code, credits, grade or tag).
- MODTrek sorts the module by the category.
Use case ends.
Extensions
- 1a. No category is provided.
-
1a1. MODTrek shows an error message.
Use case ends.
-
- 1b. The category provided is invalid.
-
1b1. MODTrek shows an error message.
Use case ends.
-
- 1c. The module list is empty.
-
1c1. MODTrek shows a message indicating that there are no modules found in the module list.
Use case ends.
-
Use case: Requesting for help
MSS
- User requests for help to check out the list of commands available and their syntax.
- MODTrek shows the list of commands available on MODTrek.
Use case ends.
Extensions
- 2a. User requests for help on a particular command available on MODTrek.
-
2a1. MODTrek shows the use case of each command and its syntax.
Use case ends.
-
Non-Functional Requirements
- The application should work on any mainstream OS as long as it has Java
11or above installed. - The application should be able to hold up to 1000 modules without a noticeable sluggishness in performance for typical usage.
- A user with above average typing speed for regular English text (i.e. not code, not system admin commands) should be able to accomplish most of the tasks faster using commands than using the mouse.
- The graph for degree progress should be rendered within two seconds.
- The application should be fast for expert users who frequently use a CLI.
- The application is not required to allocate modules to their mapping requirement automatically.
- The application is not required to handle any conflicts (eg. preclusion, prerequisites, corequisites) for any modules.
Glossary
| Term | Explanation |
|---|---|
| Mainstream OS | Windows, Linux, Unix, OS-X |
| Degree Requirement | Each module can be tagged into a degree requirement (or category) of any of the following types: University Level Requirements (ULR), Computer Science Foundation (CSF), Computer Science Breadth & Depth (CSBD), IT Professionalism (ITP), Mathematics & Sciences (MS), Unrestricted Electives (UE). |
| Degree Progress / Progression | The completion status of each degree requirement, Cumulative Average Point (CAP), total MCs completed and remaining MCs needed to complete the degree. |
| CS | Computer Science |
| CAP / GPA | Cumulative Average Point / Grade Point Average can be used interchangeably, denotes a measure of a student’s academic performance over the entire duration of his/her studies at NUS. |
| MC / credits | Modular Credits, denotes the weightage of each module and is used in the calculation of CAP. |
| Code | Module Code |
| Year & Semester | Denotes the year (counted by number of years in the course) and semester (Semester 1, Special term 1, Semester 2, special term 2) in which the user has taken the module in. |
| CLI | Command line interface. This is the bottom-right section of the app, whereby users input data on a command line. |
| GUI | Graphical user interface. Our app has a GUI that will be launched upon using the jar file |
Module, Modular Credits, CAP prior to 1 August 2023. After 1 August 2023, Module is changed to Course, Modular Credits to Units, CAP to GPA (Grade Point Average). We used the old terms to specifically cater to our target audience, who are CS students matriculated in AY 21/22.Appendix: Instructions for manual testing
Given below are instructions to test the app manually.
Launch and shutdown
-
Initial launch
-
Download the
modtrek.jarfile and copy it into an empty folder. -
Double-click the jar file.
Expected: Shows the GUI with ProgressSection shown by default on the right panel and CliSection shown on the left panel. The initial module list is empty by default.
-
-
Saving window preferences
-
Resize the window to an optimum size. Move the window to a different location. Close the window.
-
Re-launch the app by double-clicking the jar file.
Expected: The most recent window size and location is retained.
-
Adding a module
Command: add
For more details regarding the usage, refer to Add a module.
- Test case:
add /m CS2103T /y Y1S1 /c 4
Expected: Module with the code “CS2103T” will be added. The card UI component representing the module will show it as incomplete. Details of the added module shown in the response message on the command screen. - Test case:
add /m CS2103T /y Y1S1 /c 4 /g A+
Expected: Similar to the previous test case. - Test case:
add /m CS2103T /y Y1S1 /c 4 /g A+ /t CSF
Expected: Module with the code “CS2103T” will be added. The card UI component representing the module will show it as completed. Details of the added module shown in the response message on the command screen. - Test case:
add /m CS2103T /y Y1S1
Expected: No module is added. Error details shown in the response message on the command screen. - Other invalid
addcommands to try:add,add /m 2103T /y Y1S1 /c 4,add /m CS2103T /c 4Expected: Similar to the previous test case.
Deleting module(s)
Command: delete
For more details regarding the usage, refer to Delete module(s).
- Deleting a module that is in the module list
Prerequisites: The module “CS2103T” is in the module list.- Test case:
delete /m CS2103T
Expected: Module with the code “CS2103T” will be deleted. Details of the deleted module shown in the status message. - Test case:
delete /m 2103T
Expected: No module is deleted. Error details shown in the response message on the command screen.
- Test case:
- Deleting a module that is not in the module list
Prerequisites: The module “MA1521” is not in the module list.- Test case:
delete /m MA1521
Expected: No module is deleted. Error details shown in the response message on the command screen.
- Test case:
- Deleting all modules in the module list
- Test case:
delete all
Expected: All modules in the module list will be deleted.
- Test case:
- Other incorrect
deletecommands to try:delete
Expected: No module is deleted. Error details shown in the response message on the command screen.
Editing a module
- Editing a module that is in the module list
Prerequisites: The module “CS2103X” is in the module list.- Test case:
edit CS2103X /m CS2103T /g A+
Expected: Module with the code “CS2103X” will be edited, with its new code being “CS2103T” and new grade being “A+”. Details of the edited module shown in the response message on the command screen. - Test case:
edit CS2103X
Expected: No module is edited. Error details shown in the response message on the command screen.
- Test case:
- Editing a module that is not in the module list
Prerequisites: The module “CS2103T” is in the module list.- Test case:
edit CS2103T /m g A+
Expected: No module is edited. Error details shown in the response message on the command screen.
- Test case:
- Other incorrect
editcommands to try:edit,edit /m CS2103T
Expected: No module is edited. Error details shown in the response message on the command screen.
Adding/removing tag(s) to a module
Command: tag
For more details regarding the usage, refer to Tag a module.
- Tagging/untagging a module that is in the module list
Prerequisites: The module “CS3230” is in the module list.
- Test case:
tag CS3230 include /t CSF /t CSBD
Expected: The tags “CSF” and “CSBD” will be added to the module with the code “CS3230”. Details of the tagged module shown in the response message on the command screen. - Test case:
tag CS3230 remove /t CSBD
Expected: The tag “CSBD” will be removed from the module with the code “CS3230”, if it already exists. Otherwise, no tag is removed. - Test case:
tag CS3230
Expected: No module is tagged. Error details shown in the response message on the command screen.
- Test case:
- Tagging/untagging a module that is not in the module list
Prerequisites: The module “CS2104” is in the module list.- Test case:
tag CS2104 include /t CSBD
Expected: No module is tagged. Error details shown in the response message on the command screen. - Test case:
tag CS2104 remove /t CSBD
Expected: Similar to the previous test case.
- Test case:
- Other incorrect
tagcommands to try:tag,tag GESS1000 include /t ULR,tag MA2001 /t MS
Expected: No module is tagged/untagged. Error details shown in the response message on the command screen.
Finding module(s)
Command: sort
For more details regarding the usage, refer to Find module(s).
- Test case:
find CS2103T
Expected: If module with the code “CS2103T” exists in the module list, the module will be displayed on the Module Search Section. Otherwise, a message indicating that no modules are found will be shown on the Module Search Section. - Test case:
find /m CS /g A+
Expected: All “CS” modules with grade “A+” in the module list will be displayed on the Module Search Screen. If none of such modules exist, a message indicating that no modules are found will be shown on the Module Search Section. - Test case:
find /m CS1101S
Expected: No modules will be found. Error details shown in the response message on the command screen. - Other incorrect
findcommands to try:find,find A+
Expected: No modules will be found. Error details shown in the response message on the command screen.
Sorting modules
Command: sort
For more details regarding the usage, refer to Sort modules.
- Test case:
sort /g
Expected: Modules in the Module List Section will be categorized by grade. - Test case:
sort /t
Expected: Modules in the Module List Section will be categorized by tag. - Test case:
sort /p
Expected: Modules in the Module List Section will not be changed in the way they are originally sorted. Error details shown in the response message on the command screen. - Test case:
sort
Expected: Similar to the previous test case.
Toggling between Degree Progress and Module List screens
Command: view
For more details regarding the usage, refer to Toggle between Degree Progress and Module List screens.
- Test case:
view modules
Expected: The right panel of the GUI will be switched to the Module List Section, if it is not already active. All modules tracked by the app will be displayed. The way the modules are sorted will be unchanged. Modules are sorted according to year by default. - Test case:
view progress
Expected: The right panel of the GUI will be switched to the Degree Progress Section, if it is not already active. Data regarding the degree progress (calculated from all the modules in the module list) will be displayed in a doughnut chart.
Requesting for help
Command: help
For more details regarding the usage, refer to View help.
- Test case:
help
Expected: A response message showing a list of help commands will be displayed on the command screen.
Exiting the program
Command: exit
For more details regarding the usage, refer to Exit MODTrek.
- Test case:
exit
Expected: The GUI will close in 2 seconds. All data will be saved.
Saving data
-
Dealing with corrupted data files
- Open
modtrek.jarthrough thejava -jar modtrek.jarcommand. Using commands supported on MODTrek, make changes to the module list, leaving at least one module in list. - Close
modtrek.jarand edit thedata/degreeprogression.jsonfile by making any one of the following dummy changes that causes the file to be corrupted, i.e. of an invalid format:- Change the “grade” attribute of one of the modules to “Z”.
- For one of the modules, add an extra attribute “Professor” with the value “James Tan” assigned to it.
- Make any other illogical or nonsensical change to the file.
- Re-open
modtrek.jaragain. Expected: MODTrek will start with a clean slate, with an empty module list.
- Open
-
Dealing with missing data files
- Test case: Delete the
data/degreeprogression.jsonfile.
Expected: MODTrek will start with a clean slate on the next launch ofmodtrek.jar, with an empty module list. - Test case: Delete the
config.jsonfile.
Expected: MODTrek will start with all data previously saved, on the next launch ofmodtrek.jar. User’s previously saved GUI preferences are also kept. - Test case: Delete the
preferences.jsonfile.
Expected: MODTrek will start with all data previously saved, on the next launch ofmodtrek.jar. User’s previously saved GUI preferences are deleted and reset to the default settings.
- Test case: Delete the